sunset

sunset
wicken fen
Showing posts with label lens. Show all posts

Friday, 22 March 2013

Why I shoot 'raw'


Why do I choose to shoot 'raw'?

lets start things of with what 'raw' means. 'raw' is an image that has been taken directly from the sensor to a memory storage device. The 'raw' image has not been edited by the camera. A 'raw' file has also had meta data attached to it. this data will include things such as shutter speed, aperture, focal length, lens model, camera model and many more.

With a 'raw' file you get a lot more flexibility with your image. You can control allot of things in post processing. these things vary depending on your software. I use canons own photo editing software DPP. In this software you can control things like exposure compensation, white balance, colour tone weather you want more shadows or brighter highlights, clipping the whites or the blacks, sharpness and many others

This control can be the difference between getting the shot you want or having to press the delete button and missing the moment.

If you choose to shoot in a 'raw' format you must first check you have suitable software to edit the file and convert into different formats.

As with nearly anything it is down to personal preference what format you choose to use as there are pro's and cons with both JPEG an 'raw' formats

PRO'S

JPEG 
  • instant capture of a moment with out the need to edit to upload to the net or to print
  • great for memory shoots (point and shoot)
  • smaller file size (could also be seen as con)


'raw'  
  • more post processing power
  • larger file size (could also be seen as a con)
  • more artistic flare can be implemented
  • more stored meta data
CONS

JPEG
  • less control over post processing
  • smaller file size (again maybe seen as a pro)
'raw'
  • limited software that can read and edit 'raw' files
  • more time in post processing
  • not able to print or share via the web instantly
  • not all camera models can shoot 'raw'
  • a number of different 'raw' formats used
  • large file size (again could be seen as a pro)

Sunday, 18 November 2012

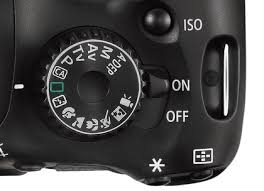
Entry level DSLR Dial Modes

Have you ever Wondered what the modes on the dial of your entry level DSLR mean. Here is my explination of them.

The dial on most DSLR's are almost all the same in the way they work and the modes they have on them.
nikon d3100

canon 550D


The pictures above is of a Canon 550D, and a Nikon d3100.

The whole point of the modes is to be able to create the perfect exposure for the scene you are shooting. Depending on the mode you pick will give you control of certain aspects such as Shutter speed, ISO, Aperture. For more info on these please see fundamentals of photography

Starting with the automatic modes

  • Full Auto - both models use a green symbol for this mode
This mode does everything for you, It will chose the correct Shutter speed, Aperture and ISO, in doing this it will most likely bump the ISO up so that it can pick the fastest shutter speed. This mode will also force the flash as well if the camera believes it needs extra light.


  • Full Auto flash disabled - both models use a symbol with a line going through a flash symbol.
This mode does everything for you, It will chose the correct Shutter speed, Aperture and ISO, in doing this it will most likely bump the ISO up so that it can pick the fastest shutter speed. This mode will not allow the flash to be fired.


  • Portrait mode - both models use a symbol with a head.
This mode is also fully automatic, But will differ from Full auto by using a wider aperture such as F5.6 to blow out the background and making the foreground pop. The aperture is dependent on your lens. This mode will also force the flash

  • Landscape mode - Both models use a symbol to mimic a mountain range.
This mode is fully automatic and will pick an aperture so that as much of the  picture is is in focus. This mode does not force the flash.

  • Macro mode - both models use a flower as the symbol
This mode is there to try to get pin sharp close up pictures. This will more than likely use a wide aperture and force the flash. This is due to the nature of the subject and distance from the lens..

  • Sports mode.- both use a figure in action symbol
This mode will try to pick the fastest shutter speed possible for the light avialable. this mode will not force the flash.

  • Night mode - both models use a symbol with a figure and a star in a square
this mode will most defiantly bump up to the ISO and use a wide aperture to let as much light get to the sensor. This mode will force the flash.

  • Canon only mode Creative Aperture mode - symbol CA in a square
this mode is on canons only. It will still choose your Aperture, Shutter speed and ISO but you can decide if the flash is fired, how bright or dark your exposure is and how blown out the background is.


Now lets get onto the modes that let you get more creative and into your exposures to get them looking like you want them.

  • P mode - this symbol is you guessed it, its a P
In this mode you get full control of the ISO (you can set it to auto if you wish). You have full control of the flash. You also have control over the overall exposure compensation. If you want a slightly darker picture dial in a negitive exposure number or a positive number if you are after a brighter exposure. When you push the shutter button in this mode halfway it will select the aperture and shutter speed. At this point you can release the shutter button and change the aperture control which will change the shutter speed accordingly. You can also force the flash aswell. 

  • Shutter priority mode - canon symbol 'Tv' nikon symbol 'S'
This mode gives you direct control of the shutter speed. on the canon 550D you can choose 1/3stop increments starting from 1/4000seconds all the way to 30seconds. You have also got full control of the ISO (you can set it to auto if you wish). You also have control over the overall exposure compensation. If you want a slightly darker picture dial in a negitive exposure number or a positive number if you are after a brighter exposure. If you force the flash in this mode you will cut the minimum shutter speed to the sync speed of your camera, on the canon 550D it is 1/200 of a second. The camera will automatically pick the aperture for you.


  • Aperture priority mode - canon symbol 'Av' nikon symbol 'A'
This mode is same as shutter priority but instead of the shutter speed you have control over the Aperture. How much control over the apeture depends on your lens. for example a canon 18-55mm lense will let you us the following aperture sizes

At the 18mm end-
F3.5, F4, F4.5, F5, F5.6, F6.3, F7.1, F8, F9, F10, F11, F13, F14, F16, F18, F20, F22

At the 55mm end-
 F5.6, F6.3, F7.1, F8, F9, F10, F11, F13, F14, F16, F18, F20, F22, F25. F29, F32. F36

  • Manual mode - both models use a 'M' as the symbol
This is my favorite mode to use. This gives you the ability to control the Shutter speed, Aperture and the ISO independently of each other. For example you may choose a shutter speed of 1/125second an aperture of F8 and ISO400. In this mode you will either have to be aware of the exposure meter and make sure it is where you want it to be, or check over your photos to make sure they are how you would like them. You may also force the flash in this mode. An added feature on this mode is in the shutter speed, you can choose the 'BULB' setting which will leave the shutter open for aslong as the shutter button is pushed, from a minimum of 1 sececond all the way until the power supply runs out.

There are a few modes on both the dials i will not explian as i have not used them oor know the basics of them. On the canon the 'A-DEP' and 'video' modes on the nikon the 'kids' mode.

Friday, 2 November 2012

Water drop photography

Shutter speed 1/200 F22 ISO1600

In this post i am going to show you my way of photographing a water drop. This may seem a crude set up but it works and other than my camera gear, the set up is made by things i find around my house.

This technique seems tricky but it all boils down to how patient you are. This shoot I took 493 exposures and only kept 29 to edit further. After editing i was only really happy with 6 of them.

First of is the equipment i used in this shoot:

  • Canon 500D
  • 18-55mm lens
  • 75-300mm lens
  • Extension tubes
  • Tripod
  • yongnuo YN560
  • Cable release
  • Flash trigger
  • reflector (in this case i used a cake board)
  • Pyrex glass dish (only there to catch water spills)
  • Clear drinking glass
  • Ice cube bag (you could use any freezer bag as long as it doesn't have any holes)
  • Backgrounds (in this shoot i used a sheet of wrapping paper, a pink towel and a flag)
  • Some sort of frame (in this case i used the top section of a shoe rack)
  • Box to support the flash
  • A pen
  • A towel
  • O and of course water
To start off you need to set-up your make shift 'studio'.
at the back is my background, at the top the ice cube bag pegged to the shoe rack. left side  flash , right side cake board reflector, center glass full of water in the Pyrex dish
Fill the ice cube bag with water and put a small pin hole in one of the corners, peg it to the frame above the center of the glass. This will provide you with a steady stream of drops in the same place.

Set the flash above the rim of the glass pointing towards the reflector. I have it set to about 1/4 power as this means you get a shorter duration of flash therefore freezing the motion better.

Set the camera up on a tripod with a cable release. Zoom your lens to the furthest and manually focus to the nearest focus distance. To get the focus correct place your pen where the drops are falling then move your camera to get the best focus.

shutter speed 1/200 F5.6 ISO100

shutter speed 1/160 F22 ISO800

shutter speed 1/200 F22 ISO1600

shutter speed 1/200 F22 ISO1600

shutter speed 1/200 F22 ISO800


Thursday, 25 October 2012

My Macro Technique

Water drops on a leaf
shutter speed 1/200, aperture f22, ISO100
2 flash setup
macro tubes


I often wish I could afford a true macro lens but alas I cannot. I have tried a few options in the past, starting with my 18-55mm lense.

I then brought a set of theses polaroid close up filters. I found these were pretty lame as they are not very good optically. If you are to only use say the +1, +2 and +4 on there own you can sometimes get a semi decent photo but steer clear of the +10 and using them in combination.

I went on to buy a canon 75-300mm zoom lens, I got a few good macro shots out of this lens on its own. The down side is that zoomed at the 300mm range the focus distance is 150cm.

A few months ago brought a set of manual macro tubes. These only work with my 75-300mm lens but they have the plus side of not containing any optics, so aslong as they fit the optic quality is that of the lens attached. Down side you loose any mechanical features of said lens, such as focus 'IS' and aperture control. The loss of focus and 'IS' is not such a big problem as i feel you get a better result from manually focusing the lens. as far as 'IS' is concerned it shouldn't be a problem as for most cases you should and probably us a tripod. The lack of aperture control is a very big downside. I have to set the aperture manually via having the lens set to say 'F22' pressing the aperture preview button and while holding that button release the lens from the body and then add your macro tubes.

With the above method the settings in camera are still very important.

I tend to keep my lens at the 75mm end, manual mode, pop-up flash on, yongnuo flash unit set to slave mode 'S1'.

In camera i tend to set ups as follows.

  • Shutter speed 1/125 - 1/200 of a second
  • Aperture preset at 
  • ISO100 - 200
  • Auto white balance
  • RAW
  • Pop-up flash on
The yongnuo flash settings
  • S1 mode
  • Zoomed to 50mm
  • 7/8th power
  • Rotated to 90degrees
  • Bounce card out
Macro set up

I will just mention that if you spend around £50 for your macro tubes you can get them with the electronic connectors.

Saturday, 20 October 2012

Light Photography

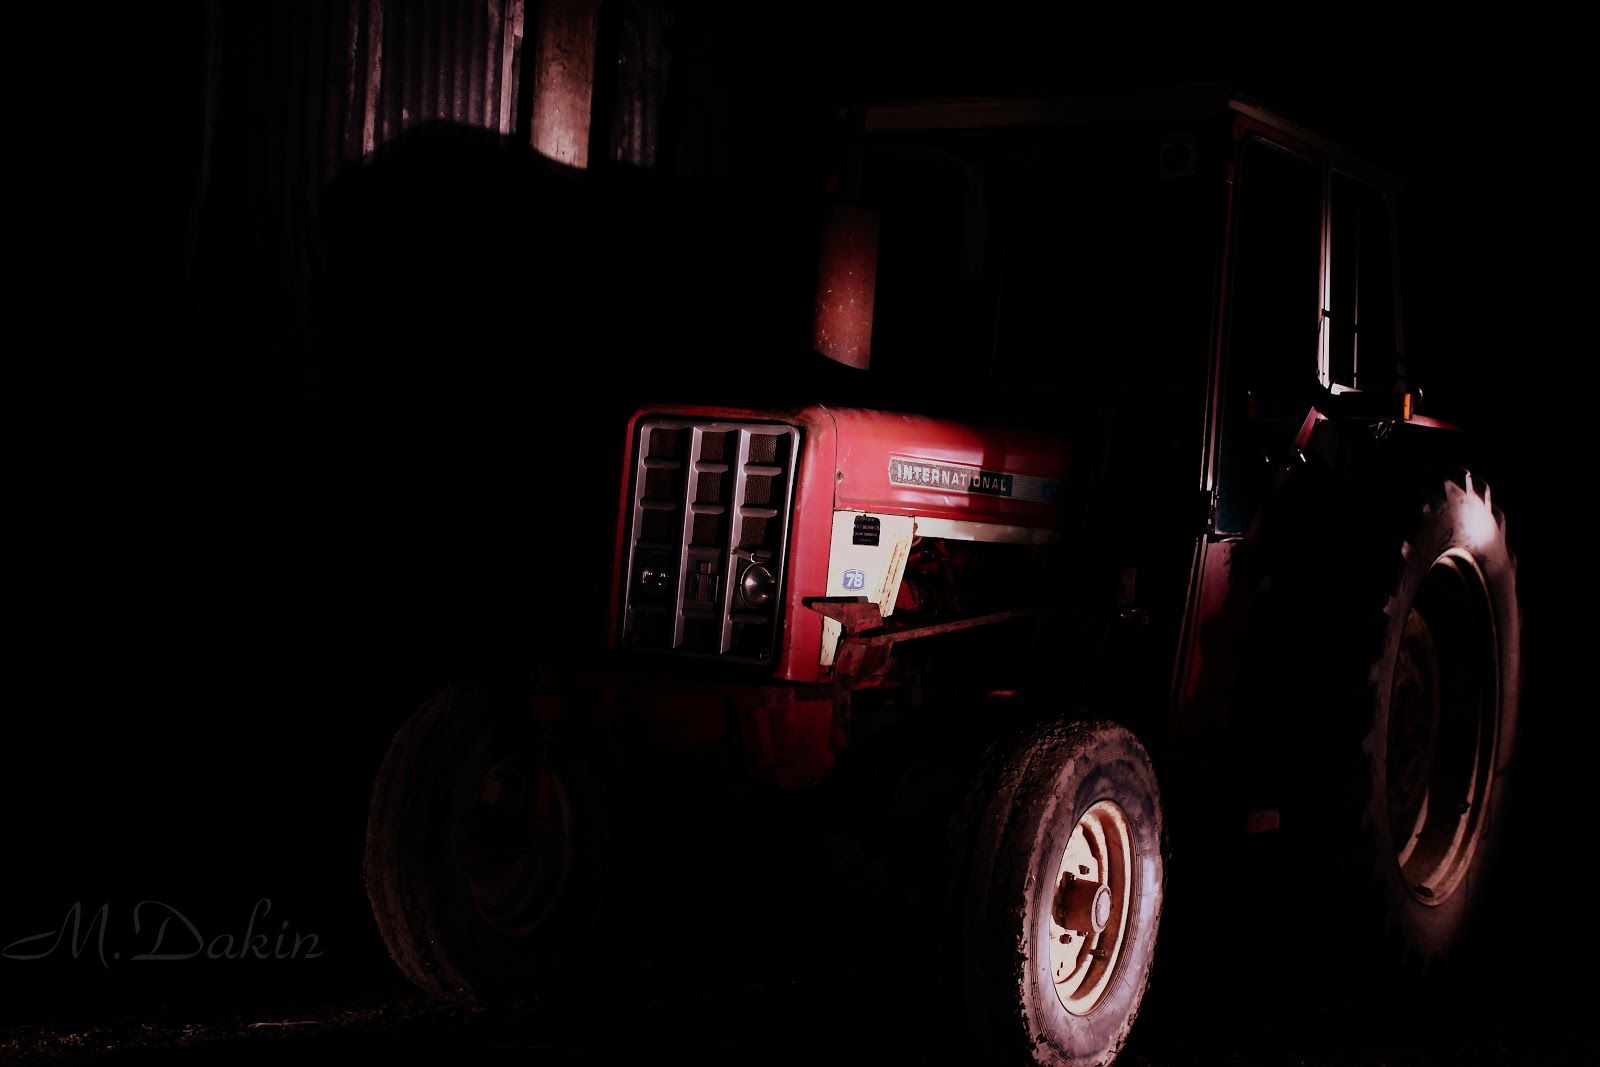
Here are some of photos manipulating the use of light

light orb

light without power

ring of sparks

life in the dark

shady tractor

the power of heat

burning under stress

spiro-LIGHT-graph

star gate

follow the laser
One of my favorite things to play with is light manipulation. To for this you need a sturdy tripod, a shutter release cable and a lot of time and patience.

Some of the sbove images have an exposure time of over 7minutes, others as short as 1/1000second  

Friday, 19 October 2012

my camera gear

In today's post I am going to show what kit I have collected over the last year.

camera gear
Starting from the back right.
  • Camera bag. I have actually got 2 identical ones so i don't have to carry all my gear at the same time.
  • Sturdy tripod
middle row from the right
  • A selection of filters including a polarising filter, nd8 neutral filter and some macro filters
  • Canon zoom lens EF 75-300mm 4-5.6 III
  • Shutter release
  • Canon EFS 18-55mm 3.5-5.6 kit lens
  • Canon 550D body
  • Manual macro extension tubes
  • Yongnuo YN560 speedlite
Front row from the right
  • Selection of batteries (i have 3 in total)
  • Memory cards (i carry 2 at all times)
  • Iwinka wireless triggers and receivers for flash
My kit is by no means professional but it is within my budget and it gets the job done